


Vivarium Construction 101
The Most Complete Vivarium Building Guide On The Web!

Introduction To Vivariums

Construction Basics
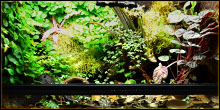
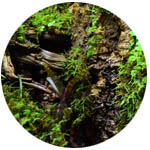
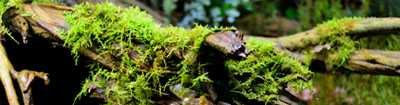
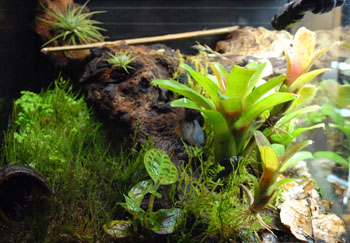
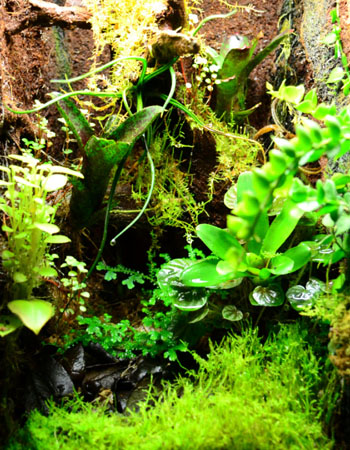
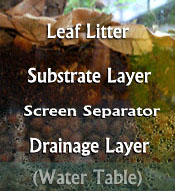 Every live vivarium starts with a few basic layers, which will provide a base for live plants & microfauna to thrive within the enclosure. From the bottom up, the elements include the drainage layer, a screen separator, the substrate layer, and leaf litter. (see picture right) Some builders also add a thin layer of Sphagnum moss above the substrate layer, to keep substrate off of the inhabitants while adding a more uniform appearance. Below, we'll describe the purposes of each layer in detail. It's important to note that while a well built vivarium can be incredibly rewarding & beautiful, skipping a step or utilizing inappropriate media in one of the layers can ultimately cause a vivarium to fail prematurely. If building a vivarium is something you'd like to do in the future, we strongly suggest reading through the article completely before proceeding. If you have any questions at all, don't hesitate to shoot us an email. We're happy to help!
The Drainage Layer
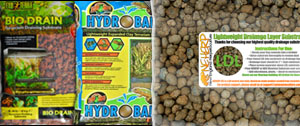
The drainage layer catches any water that flows through the substrate, keeps the substrate layer from becoming saturated, helps to sustain a healthy microfauna population, and keeps humidity stable within the enclosure. This allows for the healthy, "airy" substrate layer necessary for long-term vivarium success. The media used in the drainage layer can consist of any of the common lightweight brands of media available on the market today. (LECA, Hydroballs, Bio Drain, or NEHERP LDL) This layer should ideally have a depth of 2.5-3 inches, but this can vary slightly relative to the size of the enclosure used. Rinse whichever media you choose thoroughly to remove dust before using it, and don't add water to your drainage layer until the vivarium is completed. Pouring water over the plants, through the substrate layer will ensure the drainage media below won't shift, and it'll add beneficial tannins from the leaf litter & soil to the drainage layer below. Water should rise about 1/4-1/2 way up the drainage layer, and should never be allowed to raise into contact with the substrate layer. Also, try not to let it dry out completely, since that will negatively impact the relative humidity within the enclosure.
The Screen Separator
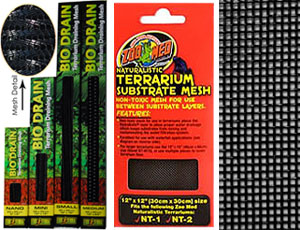
Above the drainage layer (below the substrate) is the screen separator; a non-toxic fine screen mesh that allows air & water to pass through it. The purpose of the screen separator is to keep the substrate from reaching the drainage layer and wicking up water into the substrate. Pre-cut pieces are available online for most common size front opening terrariums, and we've also begun offering custom-cut screen separators for our client's convenience. (With that being said; non-toxic screen material from a hardware store works too!) Weed-blocking material is used by some hobbyists, but be sure it's able to allow springtails to pass through it, to access the drainage layer below for the fastest reproduction.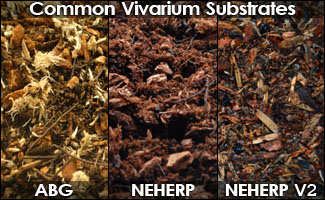
The Substrate Layer
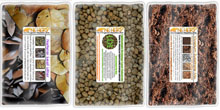
Substrate is a topic of debate between vivarium enthusiasts, and the choice shouldn't be taken lightly. A proper vivarium substrate must sustain plant life, microfauna life, the lives of the inhabitants, and resist breaking down long-term. The industry standard vivarium substrate was first coined by Atlanta Botanical Gardens, as the "ABG" substrate. ABG substrate consists of 2 parts tree fern fiber, 1 part peat, 1 part charcoal, 1 part sphagnum, and 2 parts orchid bark. In our NEHERP Vivarium Substrate, we replace the peat portion with coconut fiber, as it will break down slightly slower, allow for a more neutral pH, and offers a more potent micronutrient content for plants. We offer both types of vivarium substrate for less that it would cost to source & mix the ingredients yourself in most quantities. (We buy substrate ingredients by the pallet!)
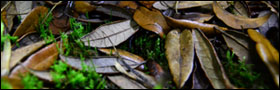
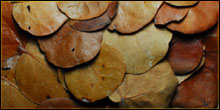
Leaf Litter & Ground Cover
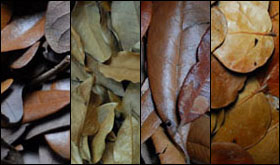
Leaf litter provides a handful of important benefits to a live vivarium, with some more apparant than others. First, it offers a realistic ground cover that provides smaller inhabitants hiding spots within the enclosure. For many shy, smaller inhabitants, these easily accessible cover-spots can make the difference between a shy animal (often fear of being far from cover), and one that is often out in the open. Over time, these leaves will begin to break down in a vivarium, which will provide small amounts of nutrients to the plants, as well as food for the beneficial microfauna. The litter will need to be added-to occasionally, and the time it will last is generally determined by the type of leaf, and a combination of humidity in the enclosure (higher R/H = faster deterioration), microfauna population, and the inhabitant species themselves. There are a handful of different common leaf litter choices used today, with the choice mostly being a matter of preference. One of the most popular ground covers for vivariums is moss, which looks great, is somewhat inexpensive, and is fairly easy to grow. However, a full carpet of bright green moss is not a natural looking choice. Leaf litter covers most tropical & temperate habitats with moss & other plants peeking through occasionally. For the most realistic looking vivarium floor, consider a mixture of moss, leaf litter, and other smaller vines & climbing plants that can peek out here & there. Using small natural accent items is quickly becoming common practice, and gives a vivarium an added touch of realism. Depending on the inhabitant species, we usually add a 1-2in deep leaf litter layer.Decor, Hardscaping, and Wood
 Aside from the basic elements already covered, most vivariums have either a background or some type of hardscaped feature. Neither is 100% necessary, but both greatly enhance the look of a vivarium, and the inhabitants will appreciate the extra climbing room & surface area. Adding loose wood pieces is common & accepted practice, but more often wood decor is added to complement a background.
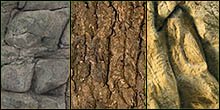
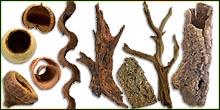
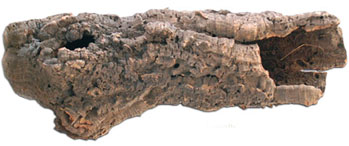
Cork Rounds & Flats
A lighter, detailed wood that's middle of the road price wise. It holds up great in vivarium conditions, and will not rot or mold even in extremely moist conditions. This wood is one of our favorites for it's variability in different shapes & sizes. (tubes, rounds, flats, etc) Cork is extremely buoyant, and isn't the best choice for underwater use. For custom backgrounds, cork is probably the most popular choice for it's ability to be cut, cracked, and shaped easily. Cork pieces can be attached to each other to create realistic structures for live vivariums. Learn more about that process on our custom backgrounds page.
Visit Cork Product Pages: Flats | Rounds | Asst. Bags | Show Grade Rounds | Cork Wholesale
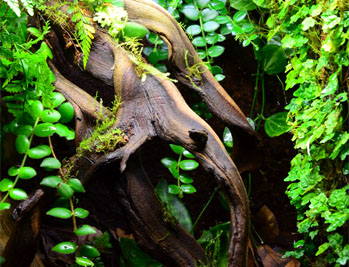
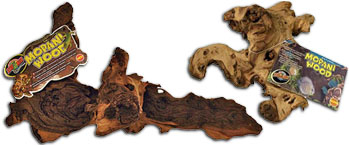
Ghostwood
A fairly light, dense, extremely detailed wood that's on the higher-end of price, but also offers the most dramatically detailed pieces. Performs well in dry, humid, and wet conditions; and is probably one of the best looking vivarium wood types out there. Dry ghostwood is a deep tan color, but when moistened it turns to a darker shade of brown as shown in this picture. This wood is the most sought-after type we offer here at NEHERP, as it's very difficult to source at reasonable prices! Also great for custom backgrounds.
Visit Ghostwood Product Page
Grapewood / Grape Vine
Grapewood offers nice aesthetics, and is very inexpensive, however it will not hold up well in a humid habitat. This wood will quickly mold over and eventually begin to rot when exposed to moisture, so we suggest only using grapewood (also called grape vine) in more dry environments. While some people have "had luck" with this wood, the majority of vivarium builders agree that it's not the best choice for a vivarium when so many other more appropriate types are available. Grapewood is an excellent choice for drier enclosures.
Visit Grapewood Product Page
Mopani
Detailed and heavy; Mopani sinks in water, and is one of the most dense types of wood out there. It will hold up long term in just about any setting (even underwater!). If you are using Mopani in a water feature, consider boiling it for awhile to extract the tannins from the wood. Tannins aren't harmful (technically beneficial) but can turn the water a "tea" color. This is a great choice for bridging the gap between land & water areas, as well as for other general decor. Be careful using this heavy wood on custom backgrounds, as it's weight can be tough to securely & safely mount to glass!
Visit Mopani Wood Product Page
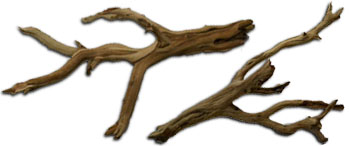
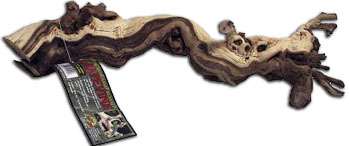
Malaysian Driftwood
Harder to find than Mopani, easier to find than Ghostwood, and priced between the two. Holds up long term in humid settings, with beautiful rough textures & shapes. This (like Mopani) sinks underwater, and is perfectly suited to bridging the gap between land & water areas. Also commonly used in custom vivarium background design, although it's slightly more difficult to mount than the extremely light cork alternative. Malaysian Driftwood is not to be confused with many other types of native driftwood which often won't hold up as well in high humidity.
Visit Malaysian Driftwood Product Page

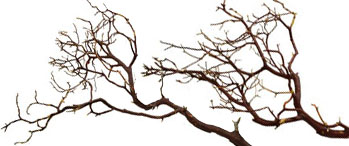
Manzanita
An extremely light, dense, highly detailed wood that's both easy to work with, and fairly inexpensive. Manzanita is extremely dense, and holds up great in most vivarium conditions. Because of it's light weight, this is a very easy wood to mount to a background, as there's less weight to pull it down. It's also fairly inexpensive, and ships cheap too, due to it being so light!
Visit Manzanita Product Page
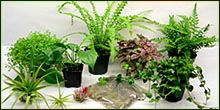
Flora Selection
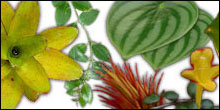
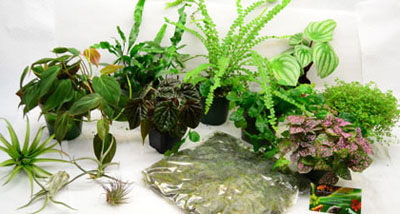 Choosing the correct flora for a vivarium is absolutely key to the success of the ecosystem, and also depends on the type of animal you'll be keeping. The most important things to consider when choosing a species of plant include the size, growth rate, optimal conditions, and the plant's ability to withstand interaction with the vivarium's inhabitant. Generally speaking, all the plants listed on our website are appropriate for vivarium use, but all the aforementioned points should always be considered before final selection.
Plant Processing
 Although we do not use chemical fertilizers or any pesticides in house, we always strongly suggest that the end user process all flora before introducing it to a vivarium. (Excluding our pre-processed moss) This is an important step that should not be skipped; regardless of where the plants are from. Why? For example, if a grower uses no pesticides in house (like us), the chance of experiencing common plant pests inevitably increases. If a grower uses chemical pesticides & fertilizers in house, the chances of introducing a potentially dangerous chemical or fertilizer increases. Either way, plants should always be processed to be safe. The industry-standard processing procedure takes only 5 minutes, and is always worth the peace of mind. Please see our plant processing procedure page to learn more.
Plant Acclimation
 Planting a vivarium might be more daunting than you'd expect if you are newer to the hobby, or unfamiliar with plants. For all plants placed in a vivarium; the 1'st few weeks are always the most critical. During this time, the plant will acclimate to it's surroundings and begin to throw roots & new growth. It's very important that they are not allowed to dry out during this critical acclimation period. Below we've got some tips on how & where to plant the most common types of plants we offer & use here at NEHERP.
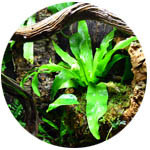
Terrestrial Plants
 Terrestrial plants should usually be placed in order of height; with the majority of tallest plants behind the shorter ones for the best appearance & visual "flow". This gives your vivarium the illusion of depth, and will minimize the difficulty of upkeep & plant pruning by keeping more area accessible. Plus, it removes the issues of taller plants blocking light from the shorter ones, with (what will look like) a natural height gradient within the habitat. We usually plant our terrestrial plants last; after all the "mountable" plants have already been placed. This keeps your serviceable work area as open as possible until the last step.
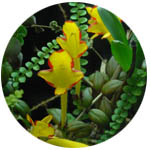
Vines & Trailing Plants
 We usually plant vines & trailing plants starting from the back to front, with climbing plants placed near the background and towards the base of any hardscaped item. That will encourage them to grow up & over the decor/background without competing for too much space terrestrially. You can train these plants to grow up the background & decor items by using floral mounting wire, toothpicks, or fishing line as a guide. After a few weeks of acclimation, the plant(s) will begin to throw their own gripping roots on whatever they are resting on, and continue to grow from there. Eventually the wire/toothpicks used to guide the plant can either be removed or allowed to break down naturally. During the first few weeks the plants are introduced to the vivarium, you should take extra care to ensure the surrounding area doesn't dry out; as roots seek moist surfaces to grip against.
Epiphytic Plants
 Mounting epiphytic plants (plants that grow out-of-soil) can be done in a number of ways. If you are mounting a rooted portion of a vine or trailing plant, wrap the roots with a small moist ball of either New Zealand Sphagnum Moss, or NEHERP moss before proceeding. If you are mounting a rootless clipping, you can either place the end in substrate, a ball of NZ Sphagnum, or leave it exposed (if humidity is 85%+) to mount it. You can then carefully attach the plant to a background with orchid monofilament line, toothpicks or floral wire. We use floral wire more often than toothpicks & fishing line, but all three have their own advantages & disadvantages. For a close-up example of how to mount plants using florist wire, please see the image in the right column. Be sure to leave no dangerous open-loops with fishing line, and no exposed points with florist wire or toothpicks to protect the vivarium's inhabitants. After a few weeks of acclimation, the plants will begin to throw their own gripping roots on whatever they are resting on, and again the supports will no longer be needed. As previously mentioned, be sure to keep the mount-surface moist during the acclimation period to encourage the roots to grip it!
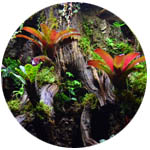
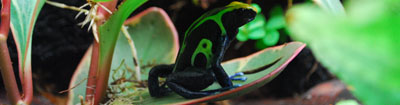
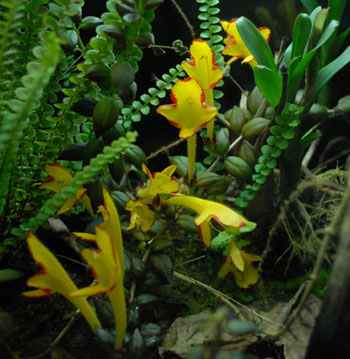
Neoregelias
 (Most commonly used in Dart Frog habitats)
A commonly used plant species worth mentioning for their special care instructions are Neoregelias. The axils of these water-holding plants are often utilized by many different species as a breeding or egg deposition site. (Neoregelias aren't used as often with larger species, due to the spines running down the leaves.) Neoregelias and other Bromeliads should be mounted epiphytically (without soil), up high, on backgrounds and/or on other pieces of raised decor, when kept in a humid environment. If kept in an enclosure where humidity will average much below 80%, these can be mounted in backgrounds, kept in net pots with a fast-draining soil. (Ex: 50% NEHERP Substrate + 50% orchid bark) Bromeliads absorb water & nutrients through their leaves, with their roots used mostly for support. The roots can be either removed or left on (depending on your personal preference); but the plant's base should not generally be wrapped in moss, sphagnum, or other slow-draining substrates unless kept in a fairly dry environment. Otherwise, wrapping the roots/base of a Neoregelia, or planting it in substrate can/will lead to the plant rotting in a vivarium. The easiest way to mount a Neoregelia is to insert the remainder of it's stolon (essentially the "hard stem piece") into a hole, whenever possible. This can be achieved by drilling a hole into the wood, background, or other decor you are using. For added support, the stolon can be hot glued in place. If your plant's stolon is too short, or a hole isn't available, Neoregelias can be mounted using floral wire, orchid monofilament line, or even toothpicks. (Trim excess wire, line, and wood)
Lighting
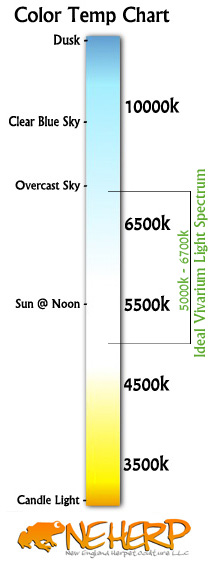
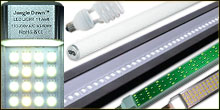
 To keep things simple, it's important to understand two of the more basic terms when it comes to measuring lighting. Kelvin; which is the unit of measurement for color temperature (see graph on right), and Lumens; which is the unit of measurement for light intensity/brightness. Most vivarium plants do best with bulbs in the 5000-6500K (Kelvin) range. There's no sure-fire easy way to determine how bright the lighting will need to be, but we recently completed an in-depth lighting guide that can help you figure out which types of lighting will suit your needs best. Towards the end of the lighting article, you'll find a detailed chart with suggested lighting solutions for specific terrarium sizes. The easiest & fastest way to figure out which type of lighting will fit a specific vivarium's size is to check out our Vivarium Builder's Lighting Kits page.
Check out our Vivarium Lighting 101 Guide for much more information regarding illuminating a vivarium!
Misting & Humidity
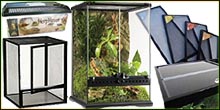
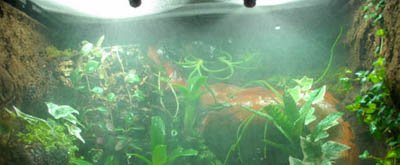 To achieve 70%+ humidity on a regular basis, you'll need a partial glass lid that's cut to fit the top screen portion of your terrarium. The percentage of screen you cover or replace with glass depends on the ideal relative humidity level required for your inhabitant. Generally speaking, we cover about 75% of the top for species requiring 60-75% humidity, and 85%+ of the top for species requiring 75%+ humidity. Many hardware stores sell & cut glass for cheap, or if you are DIY-inclined, we sell a handful of glass cutting & shaping tools on our DIY glass work page.
Selecting Appropriate Microfauna
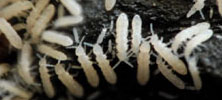
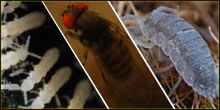
 Microfauna species are the clean up crew that makes sure the vivarium stays in top shape. They help break down decaying flora, eat fungus & mold, and vivarium inhabitant's waste. For many vivarium herp species, the right microfauna can greatly reduce cleanup for the owner. Every responsible vivarium builder suggests using captive bred microfauna only, as wild caught microfauna can carry countless pathogens directly into your vivarium. These waste-devouring bugs are called Detritivores, and no vivarium is complete without them.
Check out our Vivarium Construction 102 Guide for much more information regarding vivarium microfauna!
Tips, Tricks & Other Useful Information
 Always process plants & sterilize small decor items prior to use. This is the #1 most overlooked aspect of vivarium building.
Use appropriate vivarium substrate, like ABG or NEHERP. This is the 2'nd most overlooked aspect of vivarium building, and the most common reason for vivariums failing!
Have your vivarium set up for at least 3 weeks before introducing animals. (Ideally you want to let it cycle for over a month!) This time will allow plants to acclimate, and microfauna to build a healthy population within the enclosure.
Be sure your lighting is sufficient & suitable for your enclosure. If you haven't already, check out either our basic vivarium lighting guide (a quick rough outline of what's necessary), or our complete Vivarium Lighting 101 article for the most complete information. For a quick & easy way to see what's right for your enclosure's size, check out our Vivarium Lighting Kits!
House one species of animal per enclosure. A mixed species vivarium is something to be considered only if you have an enormous enclosure and plenty of experience with the animals involved. It's very important to understand that mixed species vivariums have nothing on the "plus" side of things besides aesthetics, and have many negative aspects. One species per vivarium is always the best practice to follow.
To clarify; each layer (both substrate and drainage) should have a depth equal to at least 2.5". (Around 5" total depth)
If you are housing an insectivore who is at risk for impaction when diving for food, consider offering insect prey items in a deli cup placed in the vivarium temporarily. This helps keep food in one place, prevents insect damage to plants, and also minimizes risks of impaction.
Always use dechlorinated water. Reverse osmosis water is an excellent choice for misting, since it won't leave water spots on the glass.
Avoid getting supplement powder on plants. It can quickly kill them!
Build the environment for the specific animal species. Don't select an animal for your environment as an afterthought.
A little mold after the vivarium is first set up and cycling is completely normal, and so long as proper vivarium building techniques are used, usually not a problem. It will go away on it's own in time, and until then it'll act as a food source for Springtails and/or Isopods. For more info on this slightly more advanced topic, check out our Vivarium Construction 102 article.
A nice landscape is key to a nice looking vivarium. Try sloping the substrate layer slightly from high to low (lowest at the front, highest toward the back) to achieve an illusion of depth.
On the topic of seeding a vivarium with microfauna... We've seen people suggest the practice of "bringing in dirt/leaves from outside and throwing a bunch in the vivarium", which is considered an extremely irresponsible practice by any reputable vivarium builder. The potential for contamination with countless pathogens, plant pests, as well as other bacterial & fungal issues greatly outweighs the $5 savings.
Since we're working with a live environment, it is critical to ensure you are working with a healthy inhabitant before introducing him/her to the enclosure. Many issues (parsites, fungal infections, etc) can be passed into the environment, and if/when your pet requires treatment, the vivarium will need to be torn down, sterilized, and rebuilt before reintroducing the animal(s). We suggest quarantining all newly acquired pets for at least 3 weeks prior to introducing them into a vivarium. Quarantining a pet is the process of placing it in a temporary home away from other vivariums/pets for a period of time, to ensure no health issues will present themselves, and keep the animal away from any other pets to prevent possible cross-contamination. During quarantine, any underlying health issues may present themselves for an easier diagnosis, and the temporary home allows for easy collection of samples for testing at a vet. Click here to link to ARAV, and find a local herp vet.
Always process plants & sterilize small decor items prior to use. This is the #1 most overlooked aspect of vivarium building.
Use appropriate vivarium substrate, like ABG or NEHERP. This is the 2'nd most overlooked aspect of vivarium building, and the most common reason for vivariums failing!
Have your vivarium set up for at least 3 weeks before introducing animals. (Ideally you want to let it cycle for over a month!) This time will allow plants to acclimate, and microfauna to build a healthy population within the enclosure.
Be sure your lighting is sufficient & suitable for your enclosure. If you haven't already, check out either our basic vivarium lighting guide (a quick rough outline of what's necessary), or our complete Vivarium Lighting 101 article for the most complete information. For a quick & easy way to see what's right for your enclosure's size, check out our Vivarium Lighting Kits!
House one species of animal per enclosure. A mixed species vivarium is something to be considered only if you have an enormous enclosure and plenty of experience with the animals involved. It's very important to understand that mixed species vivariums have nothing on the "plus" side of things besides aesthetics, and have many negative aspects. One species per vivarium is always the best practice to follow.
To clarify; each layer (both substrate and drainage) should have a depth equal to at least 2.5". (Around 5" total depth)
If you are housing an insectivore who is at risk for impaction when diving for food, consider offering insect prey items in a deli cup placed in the vivarium temporarily. This helps keep food in one place, prevents insect damage to plants, and also minimizes risks of impaction.
Always use dechlorinated water. Reverse osmosis water is an excellent choice for misting, since it won't leave water spots on the glass.
Avoid getting supplement powder on plants. It can quickly kill them!
Build the environment for the specific animal species. Don't select an animal for your environment as an afterthought.
A little mold after the vivarium is first set up and cycling is completely normal, and so long as proper vivarium building techniques are used, usually not a problem. It will go away on it's own in time, and until then it'll act as a food source for Springtails and/or Isopods. For more info on this slightly more advanced topic, check out our Vivarium Construction 102 article.
A nice landscape is key to a nice looking vivarium. Try sloping the substrate layer slightly from high to low (lowest at the front, highest toward the back) to achieve an illusion of depth.
On the topic of seeding a vivarium with microfauna... We've seen people suggest the practice of "bringing in dirt/leaves from outside and throwing a bunch in the vivarium", which is considered an extremely irresponsible practice by any reputable vivarium builder. The potential for contamination with countless pathogens, plant pests, as well as other bacterial & fungal issues greatly outweighs the $5 savings.
Since we're working with a live environment, it is critical to ensure you are working with a healthy inhabitant before introducing him/her to the enclosure. Many issues (parsites, fungal infections, etc) can be passed into the environment, and if/when your pet requires treatment, the vivarium will need to be torn down, sterilized, and rebuilt before reintroducing the animal(s). We suggest quarantining all newly acquired pets for at least 3 weeks prior to introducing them into a vivarium. Quarantining a pet is the process of placing it in a temporary home away from other vivariums/pets for a period of time, to ensure no health issues will present themselves, and keep the animal away from any other pets to prevent possible cross-contamination. During quarantine, any underlying health issues may present themselves for an easier diagnosis, and the temporary home allows for easy collection of samples for testing at a vet. Click here to link to ARAV, and find a local herp vet.
Congrats - You've finished Vivarium Construction 101!
When you are ready, check out Vivarium Construction 102 for info on some more advanced topics related to building an awesome, long lasting vivarium.
Contents:
Introduction
Construction Basics
Drainage Layer
Screen Separator
Substrate Layer
Leaf Litter
Decor/Hardscaping/Wood
Flora Selection
Plant Processing
Plant Acclimation
Terrestrial Plants
Vines/Trailing Plants
Epiphytic Plants
Neoregelias
Vivarium Lighting
Misting/Humidity
Microfauna
Tips/Tricks
Vivarium Photos
Ranitomeya variabilis Growout Vivarium

Phelsuma laticauda Vivarium
Phelsuma klemmeri Vivarium
Dendrobates tinctorius 'Azureus' Vivarium
Rhacodactylus auriculatus Vivarium

10G Vertical Vivariums For Ranitomeya
Mature Correlophus ciliatus Vivarium
Ranitomeya benedicta Vivarium
Dendrobates tinctorius 'Azureus' Vivarium

Correlophus ciliatus Vivarium

Dendrobates tinctorius 'Cobalt' Vivarium
Dendrobates leucomelas Vivarium
Rhacodactylus auriculatus Vivarium
Ranitomeya variabilis Growout Vivarium

Phelsuma klemmeri Growout
Dendropsophus ebraccatus Vivarium
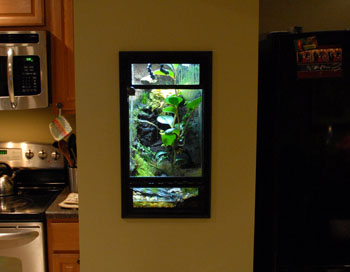
Wall Mounted 20G Vertical Vivarium
Rhacodactylus auriculatus Vivarium

Ranitomeya uakarii Vivarium
Ranitomeya variabilis Vivarium
Phyllobates terribilis 'Orange' Vivarium
NEHERP Moss Slurry Vivarium
Rhacodactylus auriculatus Vivarium
Thanks for choosing us as your vivarium info source!
We hope you'll choose us as your vivarium supply source, too!
Vivarium-Related Kits
 Base Kits
 Complete Kits
 Lighting Kits